Autocord Help
Index
Simplified Guide to Automated Recording
Viewing/Playing Exported Recordings
Where Exported Recordings are Stored
Simplified UI versus Advanced UI
Recording a Quick Memo
Select Record mode. Press the Start button. Speak. You may pause and continue recording at any point. When done press Stop. Now select Play mode. Press Start, and you will hear your recording. You may pause and continue playback at any point. That's all there is to making a quick voice memo. You may close the app, and when you return your recording will always be there for you until your record something else. Just select Play mode and Start to hear your recording again.
Simplified Guide to Automated Recording
It is very simple to set up Autocord to trigger recording automatically... Select Monitor Mode and tap Start. You will see the spectrum of whatever sounds there are at the moment displayed. If you speak you will see the display react. Just take that as an indication that everything is working. Now tap the little gear icon and the Settings dialog will be displayed. On the upper right of this dialog you will see the icon to Auto Set triggering. In a quiet moment, tap that icon. It will automatically adjust sensitivity to just above the current noise level. After a second or two, tap it again to stop it. That automatically sets the trigger. If some unexpected noise occurred during the Auto Set operation, the horizontal line representing sensitivity may jump way up, reducing the sensitivity unnecessarily. Just stop Auto Set and when it is quiet again, restart it. The horizontal line will settle itself just above the peak noise level, meaning that if a sound occurs above the noise level, it will trigger recording on - as long as that sound falls within the default, general purpose frequency range that gets set as well. Now dismiss the Settings dialog and start recording. When you speak, a red 'LED' will light up at the top of the screen and the word "Recording" will display in red. When you stop speaking, the LED will turn off and the word "Recording" will no longer be red. That's it. You now have automated recording.
Exporting a Recording
If you want to preserve your recording, press the Export/Play Audio File button while in RECORD or MONITOR mode. The recording will be saved as a mono wav file at 32,000 samples per second, with the name based on the date/time it was recorded in the format... yyyymmddhhmmss.wav For example, a file recorded at 11:33:21 am on June 1st, 2021, will have the name 20210601113321.wav You will find it in the folder Autocord.
Viewing/Playing Exported Recordings
To list and play exported audio files, press the Export/Play Audio File button while in PLAY mode. A dialog will appear with the file names translated into a friendly date/time format, for example 20210601113321.wav will be listed as "Jun. 01/21, 11:33:21". The duration in the form hh:mm:ss will appear beside it. Simply select the desired file from the list in the dialog and press the play button. You will be able to seek to any position in the audio file with the track bar, or pause and play at any point.
Where Exported Recordings are Stored
You can find your exported files with your Files app. For example, open Samsung's "My Files". From Categories select "Audio". You will see the folder "Autocord". Open the folder and you can play, share, or delete recordings. In File Manager you will see the files listed under "Autocord". Unfortunately the Google or Samsung players and many others based on the same Google API will not play any of these files if greater than 30 seconds in duration. For unknown reasons the Google API employed in these players has chosen not to support the most basic PCM file formats. If you copy them to your PC however, you will find that almost any app will play them. For serious analyses the free and open source audio editor Audacity is recommended.
Deleting a Recording
Whenever you start a new recording, the previous is overwritten. If you left a very long recording you are no longer interested in simply record very briefly over it to free up the space it took. To delete exported recordings you need to use the Files app to find them and delete them and their logs.
The Simplified UI
The operation of Autocord requires only a few UI elements. The image below shows the simplified UI the user is presented with when first opening the app...

There are three modes of operation, Monitor Mode, Record Mode, and Play Mode, selected by a tap on one of the radio buttons. As soon as you tap the Start icon, the name of the current mode you are in is displayed over top the radio buttons. When you Stop, you may select a different mode. At any time in Monitor Mode or Record Mode you have access to the Settings dialog via the little gear icon, but in Play Mode this icon is replaced by the "info" icon. When you tap this it will give you an abundance of information about the current recording. Similarly, at any time when stopped in Monitor Mode or Record Mode you may save/export the current recording via the "files" icon (Export/Play audio file icon), but in Play Mode this icon gives you access to already exported files so you can play them. There are three values displayed above the row of radio buttons. During recording, the duration of the recording and its file size are displayed and constantly updated. During playback, instead of duration, time recorded is displayed, along with the file offset. This is constantly being updated in accordance with what you are hearing. One more piece of information is also displayed, "Gain Applied". During playback Autocord "normalizes" each contiguous group of samples triggered to maximize the sound level. If a large amount of gain was applied you know that the sound captured at that moment was of low volume, and if a small amount of gain was applied, the original sound was loud. With the constant gain adjustments they all come out at the same volume level, except a faint sound will have a poor signal to noise ratio compared to a sound that was originally loud.
Simplified UI versus Advanced UI
You don't need to be a tech-wiz to use this app. When you first open the app, you are presented with the Simplified UI, which shows fewer items on the screen so you will not be overwhelmed with complexity. If you want to see what you are missing out on, go to the Options menu via the 3 little dots in the upper right corner and choose "Advanced UI". This adds the display of Peak frequency, Peak dB, and Note value, things that you don't really need if you aren't much interested in technology.
The Options Menu
Besides the above-mentioned option to choose the Simplified or Advanced UI, there are two more options available: Input Filter and Input Boost. Both are selected by default. Input filtering removes subsonics and very low frequencies below the range of the male voice that only serve to muddy up the sound. These sounds are produced by sources such as machinery, electrical equipment, and car engines. The cutoff is set to 90 Hz. The only time you wouldn't want this is if you are recording music. Autocord is optimized to capture distant sounds. Input boost helps to amplify very low-level sounds and improves the effectiveness of the input filter. It provides a boost of about 8 dB in the input stage, before further processing and amplification. It is recommended to disable Input Boost if you typically speak directly into the phone when recording, in which case there is no need for the extra gain and it may even cause a bit of distortion on the peaks.
The Spectral Display
Select Monitor mode, and press Play. If you speak or whistle you will see the spectrum of the sound you make. Remain quiet for a moment, and you will see the peak level of the ambient noise. The frequencies of the spectrum range from 16 Hz to 16,000 Hz, divided into 10 octaves, running from octave 0 on the left to octave 9 on the right. These are the same octaves you will find on a piano, except a piano doesn't have such a large range, extending only from octave 1 to octave 7. Dividing a spectrum into octaves gives the viewer a frame of reference. Zoom in on the legend below the display in one of the screenshots here. If you look closely a little to the left of center, you will see the label "Middle C", which is octave 4. This octave extends from the note C4 to B4, or in terms of frequencies, from about 261.63 Hz to 493.88 Hz. You will also see the frequency that all the other octaves begin at. Each octave is conceptually divided into 48 bands. When a sound is processed, the highest peak in each of these bands forms one vertical line of the graph. Its height shows the magnitude of that peak - if indeed a peak was found in that band. You will note that the lower the octave, the more gaps will be seen in the display as no peak was found for several bands. The fundamental frequency of the male voice is typically around 100 Hz to 120 Hz, while the fundamental of the female voice ranges from 165 Hz to 255 Hz. It is not quite that simple, however. Most sounds in nature generate a range of frequencies at once, beginning at some fundamental value and running up the spectrum. Then when we see the spectrum of a male speaking compared with the spectrum of a female speaking, we will see a considerable overlap. Also, most of the energy may be well above the fundamental. For example, a male saying "hello" may produce the highest peak at around 488 Hz. It all depends on the syllables being spoken. Meanwhile, many bird songs have frequency ranges between 1,000 Hz and 8,000 Hz. You can play with different sounds to see their spectrum - always superimposed upon the ambient noise level. With the Advanced UI (selected from the Options Menu), you will see the peak frequency and its dB level. If that happened to coincide with a musical note, you will also see its musical note value.
What's a "dB"?
"dB" is short for "decibel", which is a measure of sound level. We use the decibel scale instead of displaying the amplitude value because it conforms to how humans interpret loudness. Our ears are more sensitive to quiet sounds than to loud sounds. Our hearing sensitivity is logarithmic and the decibel scale is also logarithmic to match. A decibel is the smallest change in volume we can perceive in a laboratory setting, though it typically requires a change of 3 dB before we can all agree there has been a change in the volume of some sound source in the real world. If the amplitude of some tone is reduced by half, our ears interpret that as a drop of only 6 dB. Autocord deals in terms of relative dB, since it requires specialized equipment to determine absolute sound level. For Autocord, a sound at full amplitude is arbitrarily labeled "0 db", and anything less than that necessarily must be negative. For Autocord, -96 dB is perfect silence, so the level of any sound captured by Autocord ranges from -96 dB up to 0 dB. If you see the noise peaking up around -50 dB, some specific sound embedded in that noise at -70 dB will be barely discernible, depending on its frequency in relation to the noise of course. Then typically we don't want to set the trigger lower than 20 dB below the peak noise level.
Setting the Triggers
This app is all about triggered recording, and the reason it is named "Autocord" - for "Automated Recording". Audio capture can be triggered not only by the magnitude of the signal, but also only if it falls within a desired frequency band. Thus it can even pick out a sound of interest from below the ambient noise level. Click on the Settings button (the little gear icon) and you will see the settings screen as shown here...
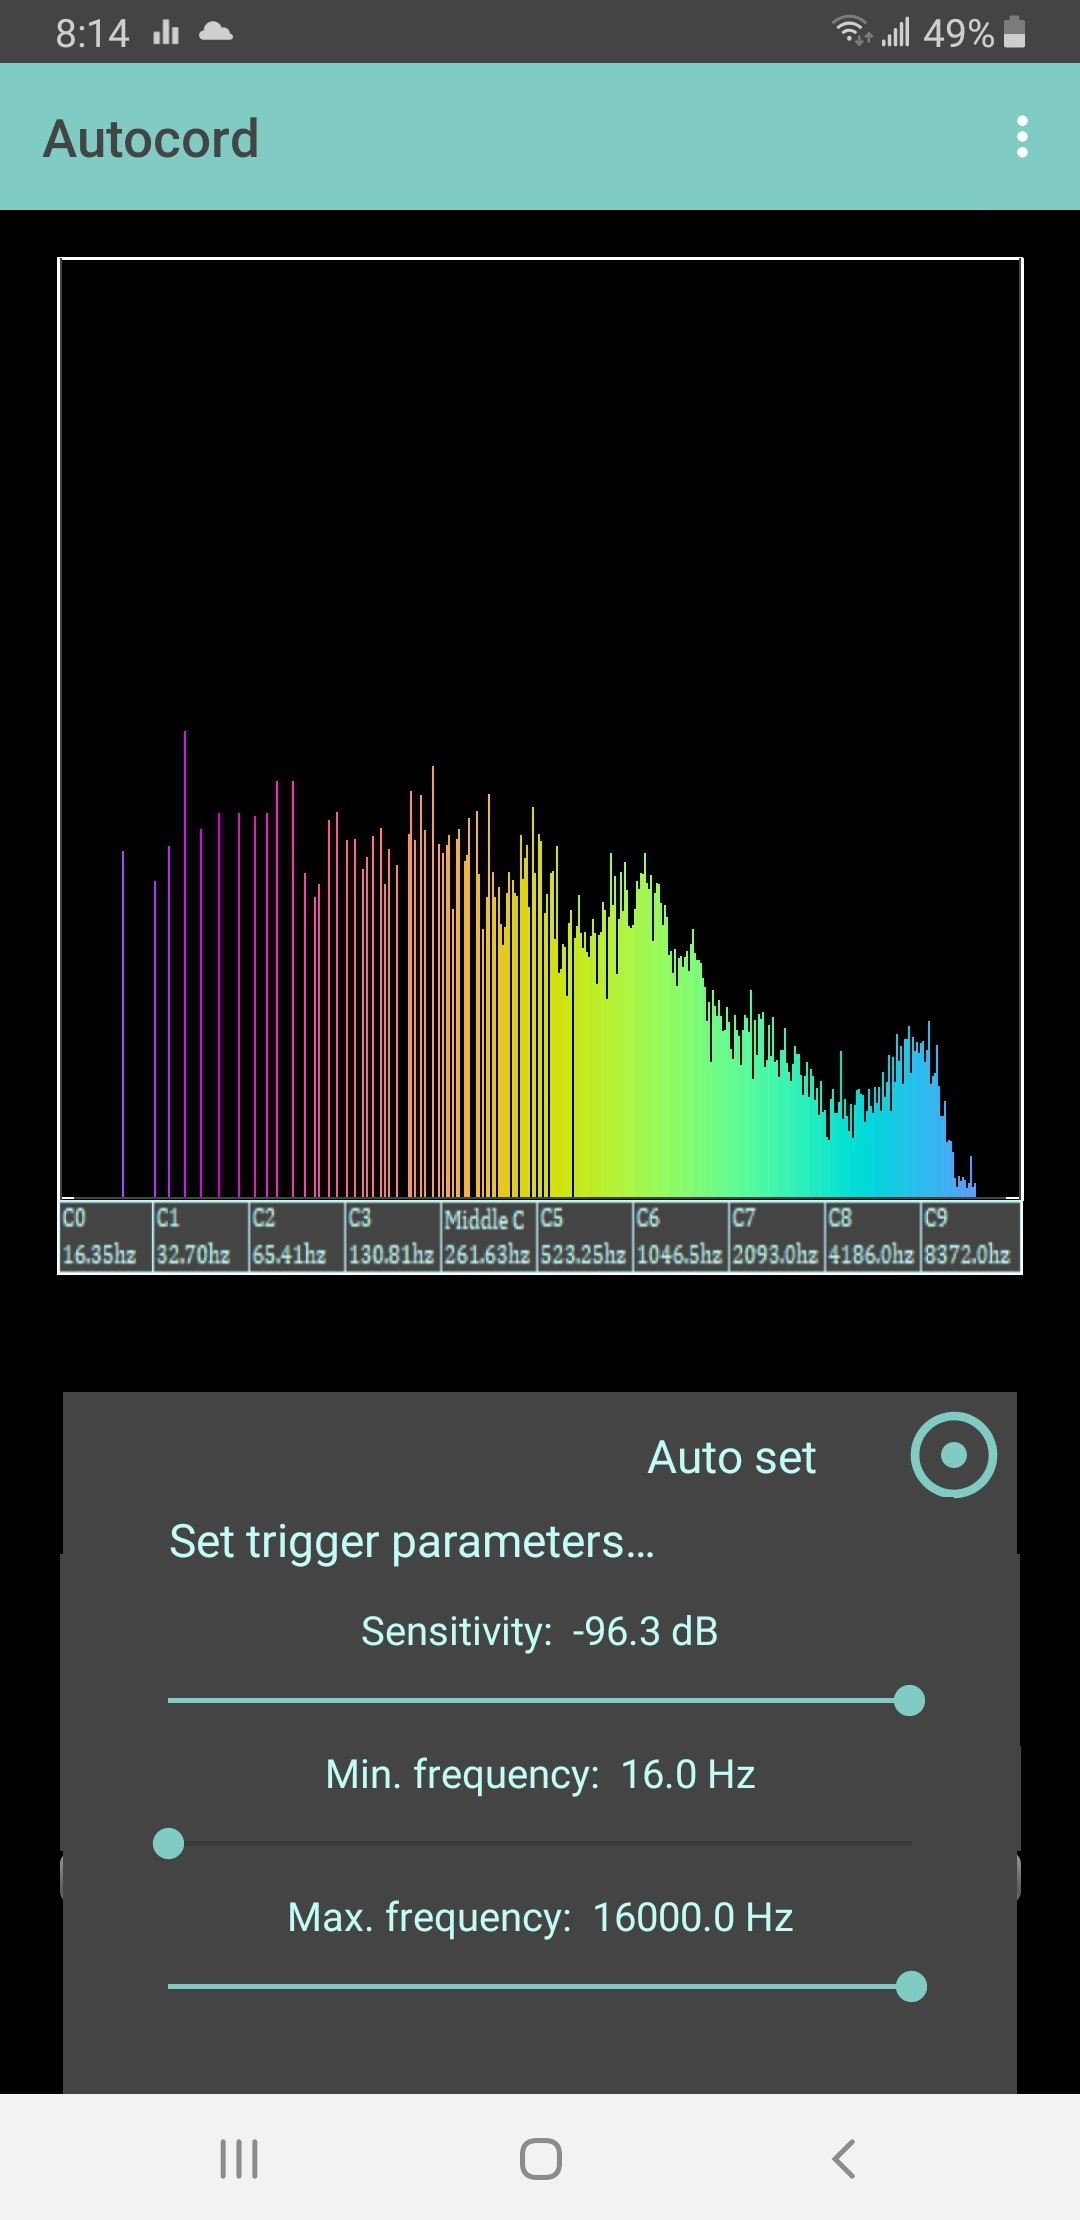
In Monitor Mode, tap the Auto Set button during a quiet moment and you will see a horizontal line being drawn across the spectral display just above the highest peaks, demarking the sensitivity threshold, and vertical lines marking the minimum and maximum frequency on the spectral display. Only sounds that fall within the frequency band set can trigger recording, and only if that sound exceeds the sensitivity threshold marked by the horizontal line, which is automatically set to be 3 dB above the peak of the noise. The frequency range will be set from about 90 Hz to about 8000 Hz, a good general-purpose range that will capture most sounds of interest such as the human voice, but you can adjust that as you wish. During the Auto Set operation you may notice the horizontal line representing the sensitivity jump a bit as a higher peak comes by. If some unexpected loud sound occurs it may kick the sensitivity line way up. Just stop the Auto Set operation and tap Auto Set again to restart it. After a second or two, stop Auto Set to freeze the setting. You may of course adjust the frequency band to your preference. If you are dictating to your phone on the desk beside you, narrow the frequency range to match your voice as observed in the spectral display and slide the sensitivity line up higher so it won't trigger on every little sound you make typing or shuffling your feet. For another example, to capture bird calls set a frequency range of maybe 3000 Hz to 5000 Hz and tap the Auto Set button again. This time you will likely see the noise level is much lower in that band of frequencies. However, you probably don't want the sensitivity below about -69 dB, in order to capture sounds that are actually audible amidst the background noise. Of course, it all depends on the noise level where you are. Observe this before opening the Settings dialog for a guide, then ensure you don't set the sensitivity to more than 20 dB below the peak ambient noise level of the full spectrum. To dismiss the Settings dialog click the 'X' on the upper left corner, tap the phone's Back button, or just tap the screen outside of the Settings dialog. Now set the app into Record Mode and press Start when ready. The word "Recording" will be displayed. When a sound occurs that triggers recording, that word will turn red for the duration of the triggering event, and you will also see a red 'LED' at the top of the display. When the sound level drops below the trigger threshold, the LED will be turned off and the word "Recording" will no longer be red. While recording you will only see the portion of the spectrum that you selected to trigger on, but rest assured that you are in fact capturing the full spectrum of the sound picked up by the microphone. During playback, you will see the full spectrum as it was captured. Experiment with this triggering a bit and you will understand it quickly enough. It's not all that complicated as it sounds, with the visual display of the triggers to guide you.
Recording Phone Conversations
If the app is set to record and the phone rings, it will automatically pause. Answer the call, and navigate back to Autocord and unpause it to capture the conversation. Only caveat here is if you are using the speakerphone, you will not capture your end of the conversation very well because of the echo cancellation done by the phone. If you are using headphones or earbuds, no problem! If you are not already in record mode, ask for a moment while you navigate to the app and set it to record. By the way, Android will briefly pause and unpause itself at any time during Play or Record when notifications sound on the phone.
Event Logging
During recording a log of triggering events is maintained. The time, sample offset, peak frequency, and magnitude of each event is individually recorded. When you export the audio file, you will find the event log in the same folder as the audio, with the same name except the extension will be ".txt". The event log will begin with a header showing date/time capture began, what the trigger frequencies and trigger sensitivity was set to, the total number of samples recorded, and the duration of the file in hours, minutes, and seconds. Then later if you open your audio file in an audio editor you will be able to locate every event. Of course, remember that events will be interspersed with the blocks of samples recorded before and after the events that give continuity to each sound captured. Typically a group of contiguous samples will begin with the half-second of audio from before the events (16 K samples), followed by some number of events, which will in turn be followed by a half-second of audio from after the events (another 16 K samples). The events themselves may be interspersed with "non-events" (up to 3 blocks of 4 K samples each), a "non-event" being audio that fell below the triggering threshold or outside of the frequency range.
Sound Sleuthing
It's becoming a hobby for some who like running Autocord all night, or to leave it capturing for hours in some location just to see what sounds they catch. For some of these sounds, it becomes a bit of a mystery to determine what created them. The thing about triggered recording is, that if all goes well, at the end of several hours you will only have several minutes of interesting sounds. If you are in a very noisy environment, you may find the noise level so high you need to set the sensitivity up above -50 dB, but then it is not sensitive enough for catching sounds off in the distance. Then try raising the minimum frequency threshold. Typically, the higher you raise this, the lower the noise level you will observe. You will still trigger on interesting events and even voices if you raise this to 250 Hz or more because remember, most sounds are broadband. Raising the minimum frequency threshold will allow you to bypass a lot of sounds that arise from "the roar of the city". Of course, if you are just recording yourself occasionally speaking directly into the phone the noise level hardly matters, as your voice will easily override it to trigger recording when you speak. A final note about triggered recording... You can set it just right and leave it running all night long if you wish but watch out for some unexpected source of continuous noise that can ruin it all for you. For example, an unanticipated motor, fan, or air conditioner switching on and staying on some time after you set the trigger. Or for a phone exposed to the outdoors, the wind picking up and making noise as it blows past the phone, or the sound of rainfall. If any of these things should occur, the noise can permanently trigger recording for the duration, which may be all night if that's what you are attempting.